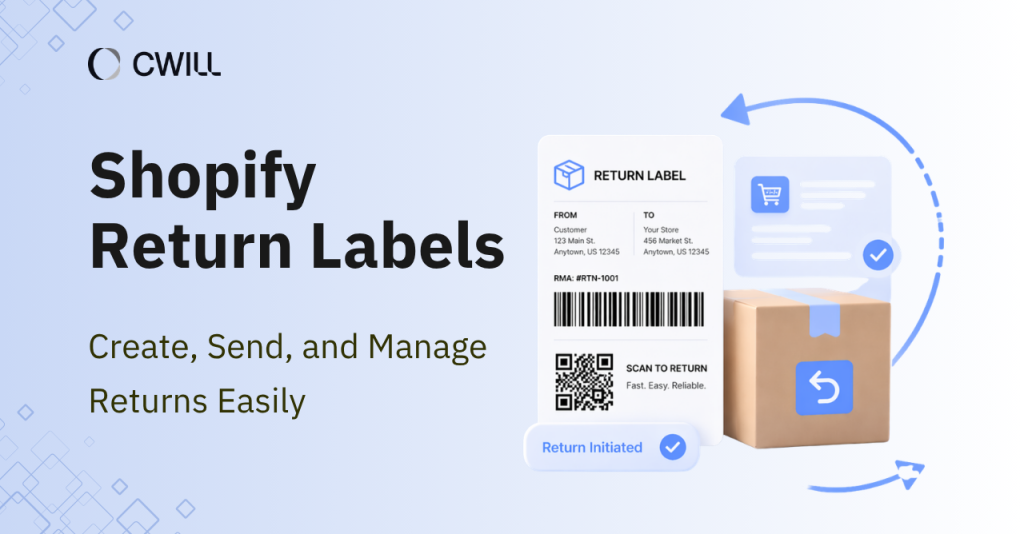
Returns are something that store owners can’t dodge. But if done right, it’s good ground to earn customers’ trust. One great way is to offer simple return options, like offering return labels.
For Shopify, return labels are merchant-provided shipping labels that let customers send items back without needing to arrange shipping on their own. Offering one can help you improve customer satisfaction and flip sales lost into a future (or repeat) purchase.
In this article, we’ll talk about what Shopify return labels are in more detail, how to set them up, their limitations, costs, and some practical workflows you can follow.
What Is a Shopify Return Label?
A Shopify return label is a prepaid shipping label that you (as an e-commerce store owner) create inside your Shopify admin after approving a return. Your customers can simply print and attach the label to the package… then send the item back to you.

Often, these return labels contain the following info:
- Tracking number
- Your business address (recipient)
- Customer’s address (sender)
- Shipping carrier information, like USPS, UPS, or FedEx, and routing details
- Order number or RMA (return merchandise authorization) number
We’d say that the tracking number is the most important detail in return labels. It’s where you and your customer can track the return and see exactly where it is in the delivery stage.
Why Return Labels Matter for Shopify Merchants
Return labels help Shopify store owners lower the number of support tickets they receive, minimize restocking delays, and recover “supposed” lost revenue.
With return labels, your customers don’t have to do much on their part, plus they can monitor the current status of their items. They won’t have to ask you multiple questions (“How can I get a return label myself?” or “What’s happening with my return?”). All they do is request a return, print the label, and send the item.
Since the process is sped up, that also means you’ll receive them sooner in your warehouse. From there, you can decide whether to restock the item (to make up for the lost sales) or process an exchange.
And of course, when returns are handled smoothly, you change the negative experience of your client to a positive one. That can convince them to try your brand again and buy something else next time.
Can You Create Return Labels Directly in Shopify?
Yes, Shopify allows you to create return labels directly from your admin. But this feature mostly works in the United States, where Shopify Shipping supports the widest range of carrier options.
That means its availability may be limited in other regions. If you are running a business outside the US (let’s say the UK or China), you’ll need to work with shipping carriers directly. Another option is to use a third-party returns management app.
You also have a few requirements to keep in mind. The order must have at least one fulfilled item before a return label can be created. Plus, international returns usually require manual setup or external tools (because of Shopify’s native return label’s limitations).
It also helps to know how Shopify fills in the label.
When generating a return label, the customer’s shipping address is used as the sender, and the merchant’s designated return address is set as the destination.
When Shopify’s Native Return Label Workflow Is Enough
Besides the U.S.-only setup, Shopify’s native return label is best if you have low order volume or you’re selling simple products. For example, if your main products are t-shirts, phone cases, or accessories like hats, this setup works just fine.
That’s because it works for simple return flows like direct processing and items without special handling.
What’s great about this native setup is that it’s super convenient to use. There’s no need to install any third-party tools, and you can send return label instructions directly to your customers. Plus, they are automatically linked to the original order. Tracking is easy to follow.
If you are a startup or have low return rates, this setup is enough. You get to build a simple workflow to process returns and also pay for the labels only when they’re used.
Shopify Return Label Limitations Merchants Should Know
Before you return the label feature of your Shopify account, you need to know its limits. They are:
- Limited support for international returns: Shopify’s native return label is mainly for U.S. domestic returns. Because international returns have custom requirements and are more complex, merchants usually need to use third-party apps… or external carrier accounts.
- Limited address support: Shopify return labels also don’t work for certain address types like military ones (APO, DPO, and FPO),… and other U.S. territories that require customs forms.
- Restricted carrier options: Shopify has built-in support for popular carriers like USPS, UPS, and FedEx in the U.S. But the available services and label types may vary (based on the carrier). For example, USPS return labels are typically for Priority Mail and Ground Advantage services.
- Return address tied to fulfillment location: By default, the return address is pulled directly from your fulfillment location. While Shopify allows you to adjust locations, you’ll need additional tools or apps for customizing return addresses per order.
- Limited support for complex issues: Shopify provides basic shipping and label creation support. But its built-in tool isn’t enough to handle complicated returns. For that, you’ll need to do some manual processing or use third-party solutions that can manage more advanced return scenarios.
Keeping these limitations in mind can help you set the right expectations and decide better whether to stick with the native setup… or use other options.
What Merchants Need Before Creating a Return Label
You can prepare the following to avoid delays when creating a return label in Shopify:
- Order status: Verify that the order is already fulfilled, and the return request has been approved.
- Return address: Check that your warehouse or return address is correctly set in Settings > Locations (Shopify pulls the address from there).
- Package details: Have an estimate of the package weight and size for the shipping option and cost.
- Billing setup: Your Shopify account should have a valid payment method or enough balance for label charges.
- Permissions: Make sure you have admin access or the right permissions to create and send return labels.
Use this checklist to speed up the process.
How to Create a Return Label in Shopify (Step by Step)
Okay. Now, here’s how you can create a return label in your Shopify admin account:
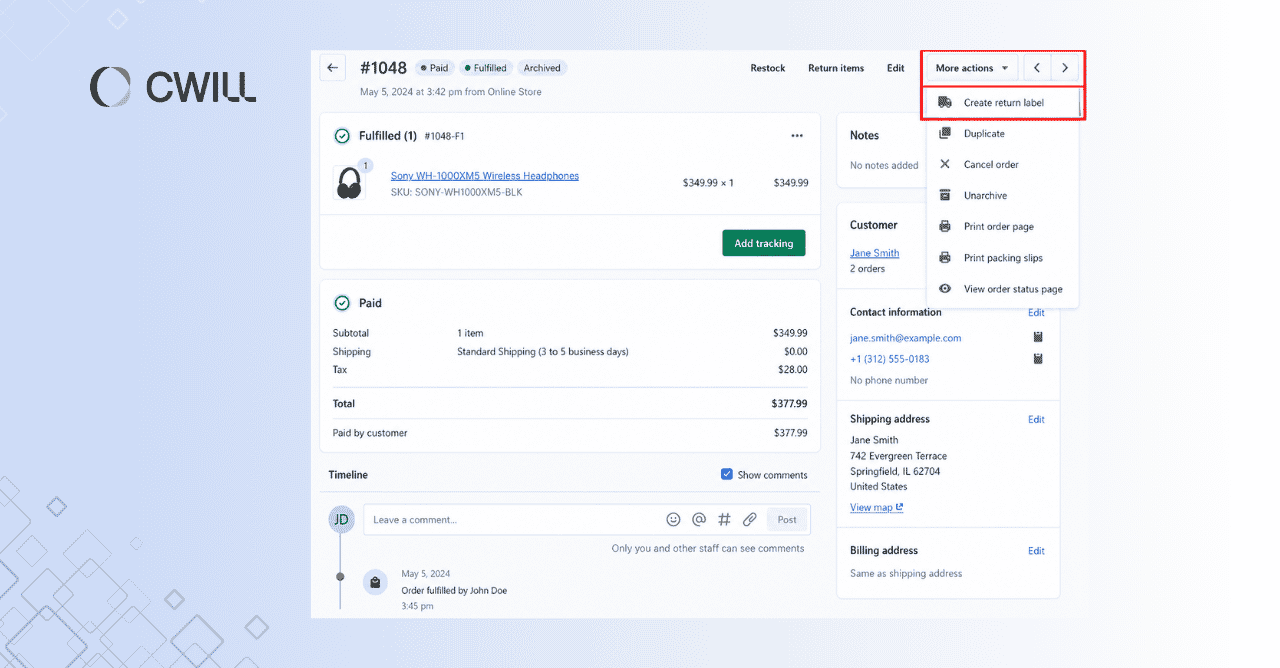
Step 1– Open the Order and Start the Return
Go to Orders in your Shopify admin, find the correct order, and click Return. Shopify only allows you to process fulfilled and eligible items (better to check these two things first).
Step 2 – Select the Items Being Returned
Next, enter the quantity of items. If your customer only returns selected items (not all their orders), make sure that the quantity matches the actual number of items. That way, you won’t have any problems during the inventory check.
Step 3 – Create a Return Label in Shopify
In the Return shipping options section, choose Create a return label in Shopify, then proceed to create the return.
After that, select the shipping method (and service), then type in the expected package size and weight. Keep this as accurate as possible because the final shipping cost will depend on it.
Step 4 – Choose the Return-To Address
Pick the correct address from your saved locations for the Return to section. Don’t forget to double-check this part because any issues might cause delays.
Let’s say you put the wrong ZIP code. That tiny mistake can cost 5–7 days in transit, or even send the package to the wrong location.
Step 5 – Review and Generate the Label
Okay. Once you complete the required fields, you can now create the return label. You won’t be charged at this stage yet.
Step 6 – Share the Label With the Customer
Send the label to your customer by confirming their email, sharing the return label URL, or choosing the option to Print Label.
This is also the perfect time to send clear return label instructions, so your customers will know what to do. If you skip this step, there’s a chance you’ll get support tickets (like a lot!).
Following these six steps will help save your team time and enhance customer satisfaction.
Looking for a simpler option without printing? Read more: Printerless Returns with QR Codes for Shopify
When to Upload a Return Label Instead of Creating One
There’ll be times when you’ll need to upload a return label. It usually happens when you tap into Shopify’s limitations (i.e., you’re processing international returns or using your own carrier contracts).
In this case, choose “Upload return label” during the return flow, then manually enter the tracking number, carrier name, and upload the label file. With this, you can opt for your negotiated rates (like UPS or FedEx).
Shopify Return Label Costs and Billing Basics
Return label costs in Shopify depend on a few key factors: package weight, dimensions, shipping distance, carrier, and service level (like ground vs. overnight).
Sometimes, carriers also apply dimensional weight. That’s why large but lightweight packages are priced based on size… and not exact weight.
Here’s a general idea of return shipping costs in the U.S. market:
| Return scenario | Average cost (USD) | Notes |
| Domestic US return (standard) | $14 – $47 | Via UPS calculator |
| Domestic US return (discounted) | $5 – $14 | Via ShipStation |
| Cross‑border (US → China) | $20+ – $200+ | Via FedEx (Not recommended for regular use because rates are too high) |
| 3PL return processing fee | $3 – $8+ | Via Catalistai (Per return, includes receiving, inspection, and restocking, but not repackaging or disposal) |
Editor’s Note: We used the same sample routes (New York to Miami, New York to New York, Alaska to New York, and US to China) with a 2 lb package (4 × 2 × 2) to get more consistent cost ranges from different pricing tools.
Shopify uses ‘pay-on-scan billing’ for return labels. You will only get charged when the carrier scans the return package. But note that the final charges can still change if the actual weight or dimensions don’t match what you entered.
One strategy many merchants use is abandoned returns. If the product value is lower than the return shipping and handling cost, it may be better to issue a returnless refund.
Let’s say that the cap you sell costs $15. If returning it will cost $12 (plus labor and packaging), it might not be worth getting it back. Often, this is applied to low-value items and high-return categories.
Read more: Simplify returns and control costs with prepaid return labels.
How Return Labels Fit Into a Better Return Workflow
Return labels work best when they follow clear approval rules. For example, you can limit returns to certain time windows or product conditions so you don’t end up accepting returns that could have been avoided.
They should also connect to what happens after. Once a label is issued, the item should move quickly into a refund, exchange, or restocking.
You’ll also start to notice patterns over time. If the same items keep getting returned, that’s usually a sign to fix the product page, adjust sizing info, or improve product quality.
How International Merchants Should Handle US Returns
You already know that the Shopify native return labels don’t support cross-border shipments. So, creating a label to send something back to China from the US won’t work.
Asking your customers to pay for the returns is also a big NO. Because it will cost them over $25 (and that for sure won’t be a good experience).
Here are some options on how you can handle international returns:
Option 1: Set up a US return warehouse
You can work with a 3PL like ShipBob or a return consolidation service. This gives you a US return address, so you can use standard domestic labels that typically cost $6.5–$12.
Returns are collected locally, then shipped back to your home country in bulk. For example, handling 50 returns a month this way can save over $1,000 compared to cross-border shipping.
Option 2: Use a third-party returns app with international support
Some tools can generate cross-border return labels using carriers like USPS. This works, but costs are still high, so it’s better suited for higher-value items where the return is worth the expense.
Option 3: Offer a partial refund and let the customer keep the item
For low-value items or minor issues, offering a 20–50% refund can be the better option. You avoid shipping costs and reduce the chances of negative reviews from a complicated return process.
Common Shopify Return Label Problems and Fixes
| Problem | What’s causing it | How to fix it |
| “Create return label” option missing | Unfulfilled order, region not supported | Make sure the order is fulfilled first. If you’re outside the US, upload a label instead |
| Label won’t generate or shows an error | Address issues or temporary carrier problems | Double-check the address. |
| Final charge is higher than expected | Package size or weight wasn’t accurate | Enter accurate package details before creating the label. |
| Customer didn’t receive the label | Email landed in spam, incorrect address | Ask them to check spam first. Resend it as a PDF or share the return label URL |
| Return sent to the wrong address | Incorrect return location selected during setup | Verify the return address before creating the label |
When Merchants Outgrow Shopify’s Native Return Label Workflow
Growth, efficiency, and more complex return setups are some of the reasons why store owners have to move beyond Shopify’s native return label.
If you’re getting more orders and returns, you’ll start dealing with different rules per product, multiple carriers, and several return destinations. And this app won’t allow you to manage all of that easily in one place.
Manual label handling becomes slower and harder to manage. When that time comes, you’ll need software that offers more advanced automations and features. And those are what a returns management solution can provide.
What to Look for in a Returns Management Solution
If you really want a solid returns management solution, look for the following features:
- Automation: Find one that auto-approves eligible returns and generates labels automatically to save hours of manual work each week
- Branded portal: Go for a solution that lets customers initiate returns on your own domain
- Exchanges: Choose a tool that lets you create a new order and a return label in one flow.
- Multi-carrier support: Opt for an app that supports USPS, UPS, FedEx, and DHL (where you can get discounted rates).
- International returns: Pick one that supports cross-border labels or offers a global return network
- Analytics: Make sure you can track return rates by SKU, reason, or channel
- Pricing: Check if it fits your budget, whether it’s per transaction (should be $3–$8 for each) or a monthly subscription.
How ParcelWILL Returns & Exchanges Helps Scale Return Label Operations
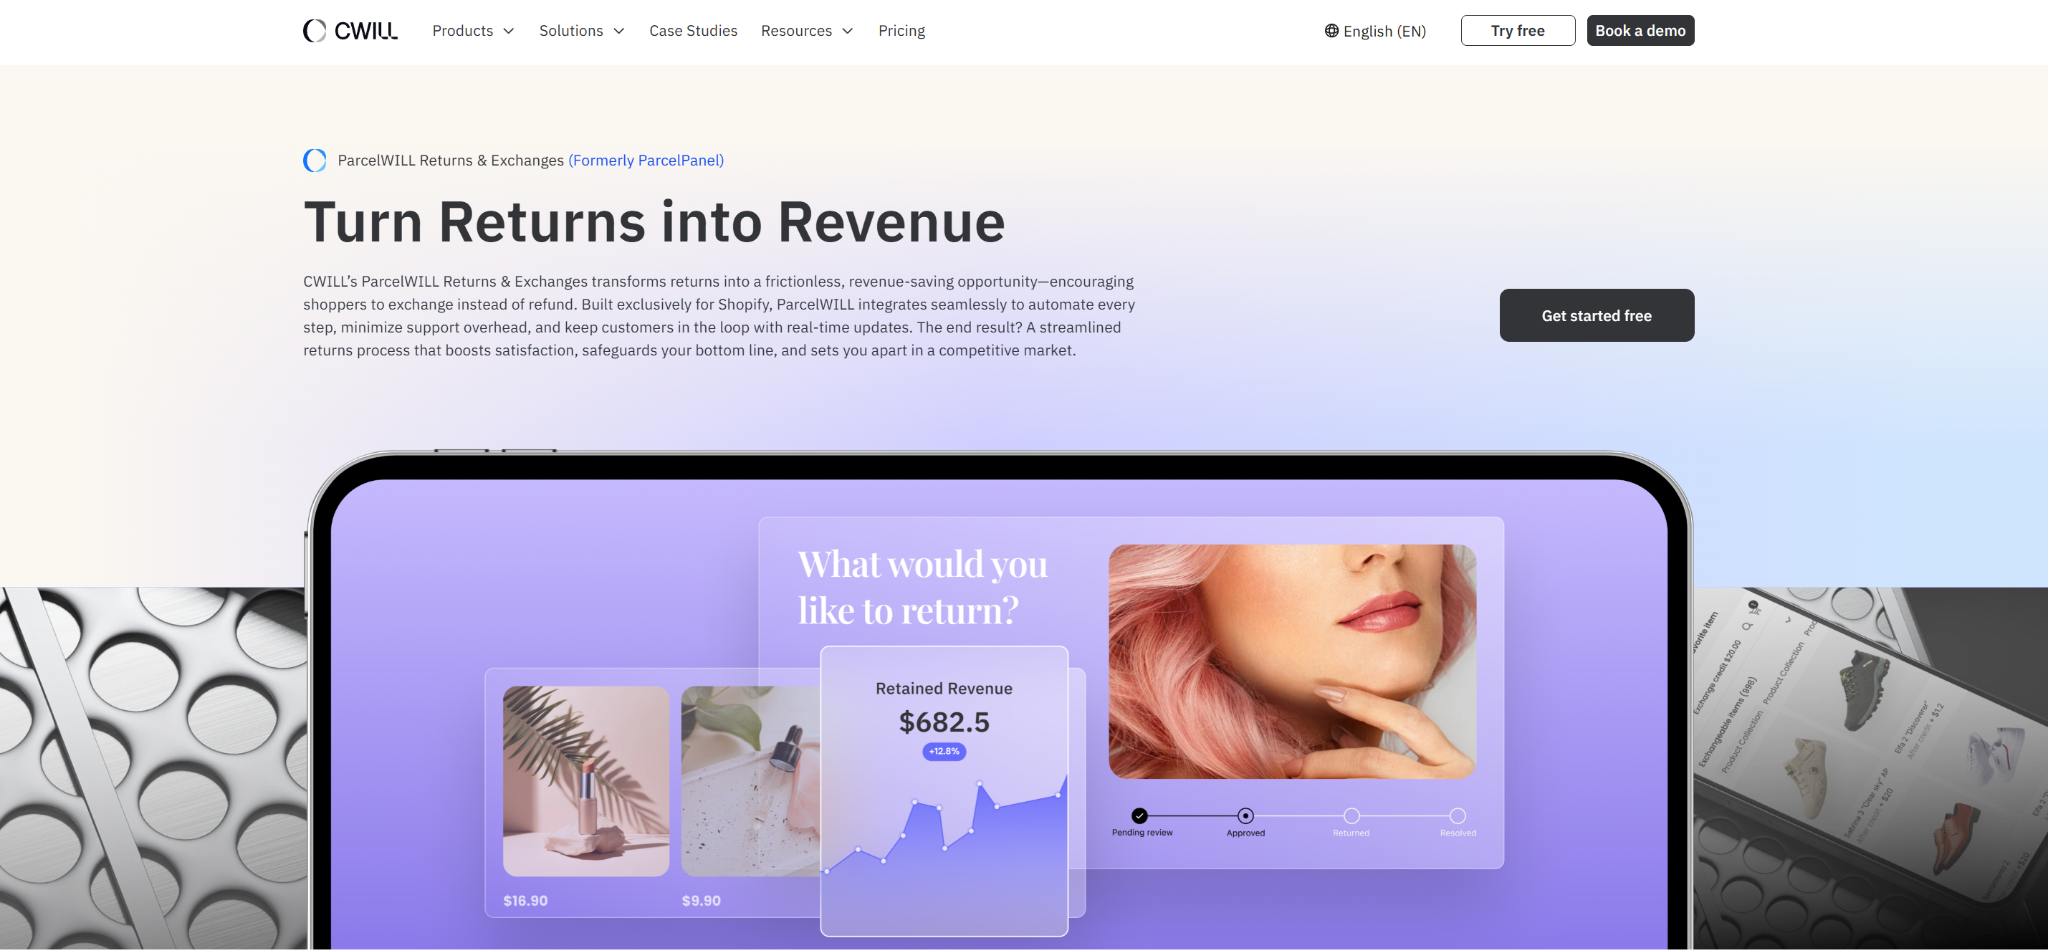
ParcelWILL Returns & Exchanges gives you more control over how return labels are created and managed as your store grows. You can set flexible, merchant-controlled return workflows based on your policies instead of relying on a fixed setup.
It also automates label generation through a branded self-service portal, so customers can start and track returns on their own. This reduces support workload without adding more staff.
You can offer exchanges, gift cards, or partial refunds to keep revenue from slipping away. With clear return data and automated updates, you can track every return, stay aligned with customers, and manage costs while keeping operations efficient.
Quick Guide: Which Return Label Workflow Is Right for You?
If you need help finding the right solution for you, check out this table:
| Your business scenario | Recommended solution | Est. cost per return |
| US domestic, <50 returns/month | Shopify native label | $15 – $48 |
| US domestic, high volume, has carrier discounts | Native + discounted account (ShipStation) | $5 – $14 |
| Warehouse in China, customers in the US | US 3PL address + native label | $15 – $48 (+3PL fee) |
| Warehouse in China, customers in the US, high-value items (>$100) | 3rd-party app + cross-border label | $20 – $200+ |
| Multiple brands/policies need a self-service portal | Dedicated returns solution (e.g., ParcelWILL) | $3 – $8+ or subscription |
| Low-value items (<$20) | Abandoned returns (refund without return) | $0 (only COGS lost) |
Note: The costs that we provided above are based on sample scenarios and estimates. Your actual return costs will still change depending on your package details, carrier, and shipping distance.
Most e-commerce stores fall into one of the scenarios above. For example, if you sell high-value items (say $150+), you might have to cover higher return shipping costs. But for low-value items, we recommend abandoned returns, as you’ll lose less money.
Conclusion
Alright. That’s all we have to share about Shopify return labels.
They help make returns easier for customers and faster for you to process. If you’re only handling simple U.S. orders, Shopify’s native setup can work for basic needs. But it becomes harder to manage once your order volume grows… and your return workflows become more complex.
In that case, you’ll need a more solid returns management platform like ParcelWILL to give you a more flexible way to handle return requests, labels, and exchanges.
Start with ParcelWILL for free.
FAQs About Shopify Return Label
How can I automate return shipping label creation in Shopify?
You can automate your return shipping label creation with the use of dedicated return apps like ParcelWILL Returns & Exchanges. It offers a self-service portal where customers request returns, and labels are generated based on your rules, with access to carriers like USPS, UPS, DHL, and FedEx.
Does the customer pay for the return label when I use Shopify’s native return feature?
No, the customer doesn’t pay for the return label. You (the merchant) are the one charged for it as Shopify uses a “pay-on-scan” model.
Can I create return shipping labels for international orders in Shopify, such as returns from the US to Canada?
No, you can’t create international or cross-border return shipping labels directly with Shopify’s native return label feature. The native feature only supports creating return labels when both your primary location and the customer’s shipping address are in the U.S.
For international returns (like US to Canada), you’ll need to create the label from a carrier or use a third-party shipping/returns app. Then, upload the label (or return label URL) to Shopify.
Can I automatically create return labels for specific products or return rules?
Yes, you can automatically create return labels for specific products or return rules using tools like ParcelWILL Returns & Exchanges. It lets you set rules for when labels are created, based on your return policies.

Content Specialist
I’m passionate about creating SEO-friendly content that also resonates with readers. I take data and insights and turn them into actionable, practical ideas. My mission? Helping websites drive organic traffic and grow sustainably.